
 e sky through one eye with the annotated and illuminated map you view inside Star Pocket through the other eye.
 A simple explaination of how telescopes work
An Easytorecall Article
Marilyn Beardsmore explains how telescopes work ...
![]()
 THERE are 2 main types of telescopes: refracting telescopes and reflecting telescopes. There is also a third type called catadioptric telescopes. These last ones are really a just combination of refracting and reflecting telescopes.
![]()
Refracting telescopes

Real Images
These telescopes work by using the ability of lenses to bring light to a focus. Look at the following diagram closely.

The light is brought to a focus at the focal point. Notice, however, that the focal length will change, depending on the strength of the lens used.
This is a simplified diagram that looks at just one configuration of light hitting a lens. Many are possible but what is not possible (or appropriate!) is to show them all here. In this case I have drawn the light rays parallel to one another and striking the lens straight on. Why parallel? Well, light rays from a point on a distant object will be near enough parallel. Consider this:

Imagine light from an object (in this case a totally realistic blue arrow stuck in the ground somewhere!) either being reflected from or originating in the tip of the arrow. It moves out in all directions. The only rays you would see are those that happen to come in your direction. If we were to place a lens in a position near to the object, you can see from the diagram that the rays are coming in from different angles whereas if you were to place a lens farther away, the light rays become more or less parallel. When thinking about viewing distant objects we therefore think about parallel light rays.
You can see the effect of a convex lens by doing a simple experiment. Take sheet of paper and hold it in front of you. Now take a lens (any small hand lens will do) and hold it in front of the paper. Now stand in front of a window during the day and move the lens in and out until you get a clear image of the outside world on your piece of paper. You should be able to see something similar to this:
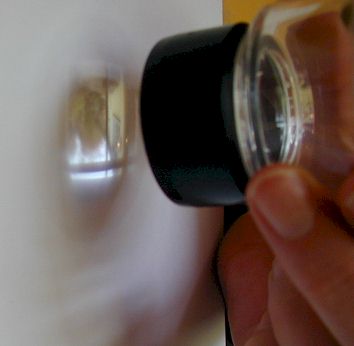
One thing to notice is that this is a real image that is captured on the paper - if you were to put a lightproof box around the paper and the lens and substitute photographic paper, you would have a photograph!
The second thing to notice is that the image is upside down - when you look through a telescope this will always be the case unless you use a correcting prism to turn the image right way up again. This is what happens in binoculars. If you are not sure why the image is upside down, have a look at this diagram:
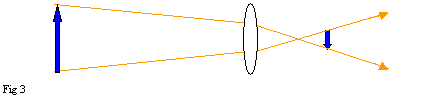
Light rays from the top of the object "cross over" with light rays from the bottom of the object.
Another point I'd like to reiterate here is that when viewing distant objects through a lens like this, the distance of the lens to the paper is more or less the focal length of the lens. In other words, when viewing distant objects, a real image is formed behind the lens at the focal point.
Virtual Images - Magnifiers
As well as producing real images on pieces of paper, lenses can also act as magnifiers. Take your hand lens and look at a small object - the object appears larger. Well, we all know that! But why? Take a look at this next diagram which shows how a lens acts as a magnifying glass.
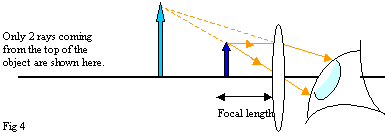
Remember that light is coming from the object in all directions (see fig 2). I have included only 2 of all the possible light rays just to keep the diagram simple.
The light blue arrow represents the magnified image and the dark blue arrow represents the object being viewed. Notice the lens will only magnify when the object is inside the focal length. Although the rays of light that reach our eyes are coming from the object they behave as if they are coming from behind the object and so we see an enlarged image. Because this image doesn't actually exist, it is called a virtual image. It's also the right way up. An interesting point here is that the size of the virtual image depends on how far the lens is from the object - try moving your lens towards and away from the object to see this. You should find that as the distance of the lens from the object increases, the size of the virtual image increases.
Putting it all together
Now, if you put 2 lenses together, one to collect the light and produce a real image of a distant object (called the objective lens) and another lens to magnify this real image (called the eyepiece) then you have a telescope! Of course we can improve on this arrangement by putting a tube around the lenses to stop the image being washed out by other light sources (try going outside to get a real image on your piece of paper and you will begin to understand the problem!), mounting the whole thing on a tripod to keep it steady and adding a few refinements to make viewing easier.
Below is a simple diagram showing the usual arrangement of the lenses in a refracting telescope:
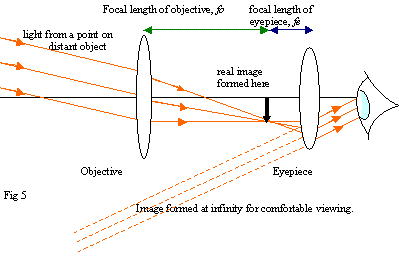
The real image produced by the objective is formed at a distance fo from the objective and the eyepiece is placed at a distance fe from the real image so that the magnified image appears to come from far away. Technically, it is said the magnified image is formed at infinity.
A further point to note is that the length of the telescope is the sum of the focal lengths of the objective and the eyepiece. (See fig 5).
Also the final image is upside down. This is because the objective lens inverts but the eyepiece does not. For astronomical telescopes this is not really a problem, but for binoculars and telescopes where the image needs to be the right way up, 45° prisms are placed between the objective and the eyepiece and this has the effect of turning the image right side up.
The main problem with refracting telescopes is the fact that lenses are difficult and costly to make, especially as objective lenses need to be as large as possible. This is because both sides of the lens have to be ground to a high standard in order to avoid image distortion.
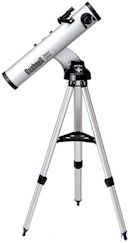
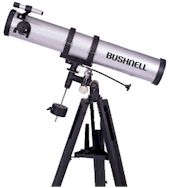
A Refracting telescope
Reflecting Telescopes
Reflecting telescopes work on similar principles to the refracting telescope but in this case the objective is a mirror rather than a lens.
If you have a concave (curved inwards) mirror and you direct light from a distant object onto it, the mirror will focus the light like this:
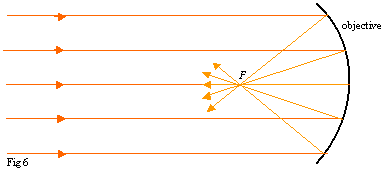
The parallel light rays from a distant object are shown coming from the left. They strike the curved mirror and are reflected back, converging to form a real image, upside down, at the focal point, F. Remember, the focal point is at a distance from the mirror called the focal length and the length of focal length depends on the curvature of the mirror. (Just a quick note here. Some of you may remember from school that the image you see in a mirror is a virtual image. This is true. However, in this case, the reflected rays actually do intersect one another at the focal point and then diverge from that point as if they had originated there. Therefore the image formed at the focal point is, in fact, a real image.)
This is all starting to look familiar.
As in the case of an objective lens, the image formed at the focus is real and upside down (or inverted, if you prefer!). The only difference so far is that the image is formed behind a lens, whereas here, the image is formed in front of the mirror.
We now have to find a way of directing the rays of light coming from the real image so that the image can be viewed. One way is to direct the light to the side where it can be viewed through an eyepiece by placing a small, plane (flat) mirror just in front of the focal point at an angle of 45°.
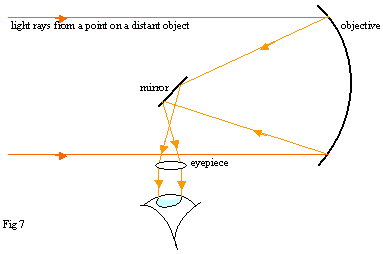
For clarity, I have only included 2 incoming rays.
You may have noticed that unlike the refracting telescope, the length of the reflecting telescope does not have to be the sum of the focal lengths of the objective and the eyepiece - this is why reflecting telescope tend to be shorter and than their refracting counterparts.
Notice also that only one side of the mirror has to be ground - this makes them cheaper to make than a refracting telescope with the same sized objective.
There are other possible arrangements but as the purpose of this article is merely to provide a simple explanation of the general principles involved in telescopes it is not really appropriate to include them all here. Therefore, I have selected some links at the end of this article which you might find interesting.
A Reflecting telescope
A quick comparison between refracting and reflecting telescopes
Refractors |
Reflectors |
|
Objective |
Lens |
Curved mirror |
Shape |
Long narrow |
Short fat |
Eyepiece |
At the back |
Near the top |
Viewing strenghts and weaknesses |
Good for observing pinpoint objects such as stars and planets. Tend not to be so good at viewing diffuse objects such as galaxies because they tend to have small objectives. |
Good for observing diffuse light sources such as galaxies and nebulae. Also good general viewing of planets and the moon. |
Cost |
More expensive per inch of aperture (objective size) |
Less expensive as only one face of the mirror has to be ground. |
A Note on Magnification
Magnification depends on the focal length of the objective and the focal length of the eyepiece. There is a simple formula you can use to work this out:
Magnification = focal length of objective, fo, divided by the focal length of eyepiece, fe,
So, for example, if the objective focal length of your telescope is 900mm and the eyepiece you are using is 4mm, the magnification is given by:
Magnification = 900mm/4mm = 225x
If the focal length of the objective is 700mm, then the same eyepiece would achieve a magnification of
700mm/4mm = 175x
and so on.
However, a good rule to remember is this: As magnification increases, field of view and resolution decrease. Resolution is the ability to see fine detail, so good resolution means good sharp images, and poor resolution means blurry images.
The amount of magnification your telescope can reasonably achieve before the image becomes too degraded can be worked out by a simple rule of thumb: 50x per 25mm of your objectives diameter. So if you have a 115mm diameter objective (4.5inches), then the best magnification you could reasonably expect is:
115mm ¸ 25mm x 50 = 230x
The value of 50 given here assumes that atmospheric conditions are good - this figure could be as low as 30 if viewing conditions are poor.
Having said this, and with all other things being equal, probably the most important specification of a telescope is the size of the objective. The bigger the objective the more light the telescope will be able to receive and the more light it can receive, the brighter the final image will be. No doubt you have seen pictures of enormous dishes of telescopes such as the Arecibo. You can see pictures at www.naic.edu/hires/aoviews.html. Note that they are rather large and will take a while to download.

You can view a large version of this from www.naic.edu/hires/ao014.jpg and similar photos at www.naic.edu/hires/aoviews.html.
Because of their large light gathering capabilities, telescopes such as this are able to image extremely faint and distant objects. Think of it like this: when you look at the sky, you can only see the brightest stars in the sky because your eye is quite small. If you had much bigger eyes, you could gather more light and see more stars and galaxies; if they were bigger still you could detect even fainter objects! This is where telescopes come in.
Therefore when considering buying a telescope, you should always look at the general quality of the telescope and the size of the objective. Claims about magnification are a secondary consideration.
Links to other refracting telescope pages ...
• www.home.vicnet.net.au/~lvas/welcome.htm - Latrobe Valley Astronomical Society
• www.tivas.org.uk/socsite/scopes.html - Tiverton Astronomy Society
• www.astro.org.uk/buying/index.html - The Stratford upon Avon Astronomical Society
If you have any questions or comments on this article, please .
See also: Telescopes
UK websites selling telescopes